OpenPlant Support Engineering Help

Export Data

This option lets you create an Export Database which can then be used during the import process.

Accessed by selecting the Export Data option from the Class Browser Data ribbon.

When you select the Export Data option from the Class Browser tool ribbon, the following dialog displays letting you define what type of data to export. On the left hand side is a list that contains all the available tables in the Project's database. By selecting these tables and pressing the right arrow button, you will add those selected tables to the Transport Options table on the right hand side.
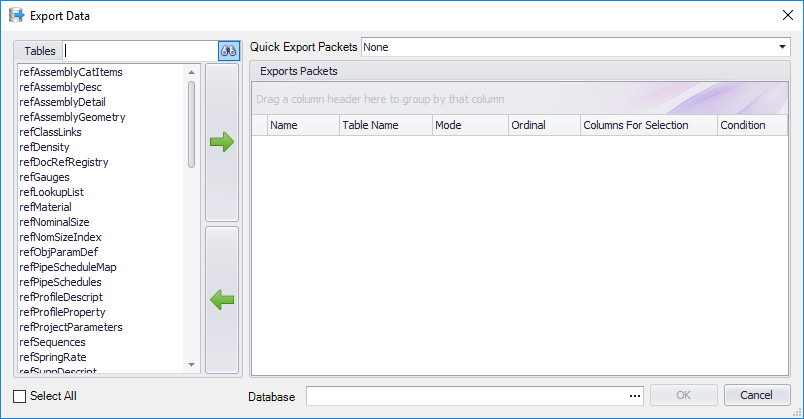
Tables

SettingDescription
Filter Tables In the Filter field, enter filter criteria into the field and click the Filter Tables icon next to the field.
Tables List List the available tables to export. To select tables from the list and use the arrow buttons to add or remove them from the export package.
Quick Export Packets This pull down allows the quick selection of existing export packets to be added into the package. The Default packet includes most of the tables in the project with their recommended settings. The other two examples are just quick examples that can be used for classes or component updates.

When a new packet is added into the package (as in the case of adding a new table from the table list) and it is saved, this process will become available in the pull down when Export Data dialog is opened again. It will also update existing packets if they have been changed.

Note: When selecting a packet from the pull down, it will clear out all existing packets from the Exports Packets table.

Transport Options

The Transport Options table lets you customize how each table will be handled in the export process.

SettingDescription
Name This is the name of the export process. This is automatically generated when pushing the tables over to it and isn't currently used in the import process, but the idea behind it is that if a user has multiple export processes in one table, they can select which one they wish to process. Right now you can just say it's a general label to group the processes by.
Table Name This is the table that is being exported.
Mode this is the mode at which the table will be import when the import process is done.
  • Override; Overrides the existing table with the new one (this will drop the old table).
  • Append; Appends existing data to the target table.
Options Defines additional options to use during the import process.
  • None; this implies that there are no options.
  • Update; This option works with the append, if it isn't set, then when you append, only new rows will be added, existing rows will not be modified. When it is checked, then the import process will attempt to locate the existing row, and update its information.
  • Rebuild; This tells the import process to rebuild the existing table. This will back up the existing table, drop it from the database, rebuild its structure from the importing table, then repopulate it with the backed up data.
Note: This is useful when a column has changed in size, however, you need to know how the column has changed. For example, if a column increase from 128 to 512, this would increase the targeted table's column to the needed size. However, if a column was reduced in size, this could cause an issue.
Ordinal This defines the order in which the tables will be imported.
Columns This allows the user to determine which columns to export/import. Basically, if the user only needs to update the Descriptions in their properties, they may just select the column [Description]. This will still export out the whole table but it will only import the data in the given column. This would also be typically used with the Append and Update option. But it can also be used when you want to exclude some columns form being populated, such as the Update and Create columns.
Condition An SQL condition statement that will filter the import to specific things. For example, if you want to just import properties with a base class of 10 you would put the following:
The syntax to this is same as what one would use in sql.
Note: This should only be used by advanced users.